
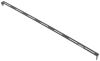
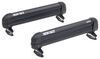
The Rhino-Rack Sportz bar sports Zwifloc channels, empowering you to effortlessly switch setups for various activities at a moment's notice. The under bar slider gives ease of leg installation and Twin Strip Technology redefines wind management.
Features:
Specs:

California residents: click here
Videos are provided as a guide only. Refer to manufacturer installation instructions and specs for complete information.
This is Curt with etrailer and today we're gonna be taking a look at the Rhino Rack Sportz Crossbar, which is the newest design from Rhino Rack. We're gonna be taking a look at how it looks, how it works, some of the newer features that are just different from anybody else out there, and what kind of compatibility we have. So stick around and we'll talk you all about it. The most noticeable difference between the Sportz Crossbar and really any other crossbar out there on the market is that it actually keeps an open channel at the top. Most other crossbars that have an Aero bar with a T-mount track system at the top keeps a piece of weather stripping over it in order to keep out any kind of vibration or wind noise that might, you know, make things a little bit annoying as you're going down the road. These offer a double weather strip on either side of the channel and they're ridged in a way that it's actually going to make air go over the opening rather than straight across it, which is gonna cause that whistling or humming sound you might hear going down the highway when you have an open channel like this.
The most common Aero crossbar that you're gonna come across with Rhino Rack is their Vortex bar, which is the design that they've had out for some time. It offers a really nice weather stripping going across this channel right here that also helped with the airflow. As we compare it, though, to the new Sportz bar, the Sportz bar feels a little bit beefier. It's got a bit more of an aggressive look to it and one of the other differences is going to be the end cap here. The end cap for the Sportz bar is designed in a different way.
They actually took their inspiration from the tip of an airplane wing, and what they found is that it significantly reduces vibration in the bars, which is also gonna make the ride a little bit more comfortable and also help reduce that road noise. And if you're somebody that wanted to, maybe, upgrade to this from your Vortex bars, you can actually use the weather stripping through this channel in the middle. Maybe you're somebody that doesn't use the T-mount accessories all that much and you really just use clamp accessories. You can close this bar up if you wish to just using that vortex strip out of your old bars or a Vortex strip is available for purchase right here at etrailer.com. So if you are somebody that owns Vortex bars now and you wanted to upgrade to something like this, 'cause you do like using that T-track quite a bit, it can be a little annoying on that bar to have to cut squares out in order to make it happen.
The cool thing is, is you can upgrade from those Vortex bars to the Sportz bars, still using the same towers and you could double up by using the weather stripping from it if you desired. But talking a little bit about the look of these, I really, particularly, like the look, it's not as, you know, blade shaped I guess you would say, as some of the other Aero bars that are out there on the market. It really does have kind of a more aggressive look to it, especially since these kinda ridges across the top are more visible. It just gives it, like I said, that really rugged, aggressive look that I think is gonna look awesome on different trucks and SUVs, particularly four-by-four models. But I think these are usable on just about every vehicle out there on the market.
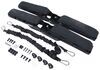
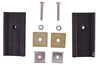
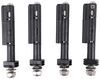
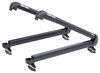
Rhino Rack put a lot of time, effort, and thought into creating a crossbar with an open channel and you might be asking yourself, well, why do that Well, the reason is because they are coming up with a new T-mount system in here and it's called this With Lock System. And the cool thing about that is having this open channel means you're not gonna have to feed accessories in from the side that have it. They can be dropped straight in, which means if you already have different accessories up here, you won't have to completely rearrange them in order to get a new item up at the top. It works very simply and there's a lot of different items, like in particular different tie downs. So we've got this clamp style tie down, we're just gonna drop it in, slide it over, we drop this block in right here, feed it under, drop in our bolt, and now we can tighten it down just like this. And what that's gonna create is an extra tie down anywhere we have it. So if you have a cargo basket up here and you've got some things tied down to it, but you just wanted that extra sense of security, something like this that you can drop in wherever you need to is an awesome idea. Plus, if you have, maybe, a canoe or a kayak up here, that extra tie down's just gonna give you a bit better of a peace of mind too. Now let's take a look at what can we can expect from underneath the bar. So as we turn it over, one of the first things you're gonna notice is that it has this scale here. Now that is to help us determine where our towers need to go and basically how far apart on the bar they need to be in reference to whatever the particular vehicle is. So different vehicles are gonna need different fit kits, different towers, and even different bar lengths. So that's why it's important to use our fit guide to make sure that you get the correct kit. But what this is gonna do is in the Rhino Rack instructions, depending on your vehicle, it's gonna ask you to set your towers a particular distance apart on the bar in order to fit the roof. So the first thing we'll do to determine that is remove our end cap here. And these don't have any special mechanism, they're just held in by a little clamp, so you just kind of gotta work it free. And this can be a little bit tough off the bat, but that doesn't bother me 'cause that just gives me peace of mind that it won't be flying off as we're going down the highway anywhere. So on this particular truck, they ask for it to be at 116 millimeters. So the idea is going to be is to remove our scale, we're gonna take our tower and we'll be using this block right here to slide into the T-slot. We're gonna get that slid over. Then we're gonna take our scale and with the larger number facing inward, we're gonna reinsert it there. And at 116 millimeters, we're just gonna move this down to that point, which is going to be right there. Slide our tower over. We're gonna use this slide here to kind of bump up against it and get it in place before we tighten it down. (background chatter) Once we have this tightened all the way down, we can just double check our width. Now at this point, we're not doing a permanent install, so I won't be cutting it, but at this point, the idea is you trim this piece off, replace your end cap, okay And what that's gonna do is it's gonna close any gaps underneath the bar as well. And that's pretty important. Not every crossbar system does that. You do end up with a gap sometimes over here that is going to create a lot of road noise. And the fact that this is essentially right above the section anyway, that's right above all of your windows as you're driving, if you got the window down going down the highway, that could be a loud and uncomfortable drive. So the idea would be to trim that off and replace the end cap and it really is gonna offer a much more smooth, less vibration, less noise, all of those things that make a roof rack that much more comfortable to use. There's a look at the Rhino Rack Sportz Bars. Now if after watching this video you decide that these are the bars that you want, couple of things. One, please make sure that you use our fit guide. That's gonna make sure that you get the correct length of bar. It's also gonna make sure that you get the correct towers and fit kit for your particular year, make, and model as well. Also, if you get these and you install 'em and you use them a few times, please share any experiences or even any pictures of it in the comments below. We would love to share your story with our other neighbors so they can make the best decision for themselves. So once again, this is Curt with etrailer. Thanks for stopping by.
Condition: Missing Parts
Notes: Item is missing 2 measuring stirps and 2 internal slider strips.
Info for this part was:
At etrailer.com we provide the best information available about the products we sell. We take the quality of our information seriously so that you can get the right part the first time. Let us know if anything is missing or if you have any questions.


Thank you! Your comment has been submitted successfully. You should be able to view your question/comment here within a few days.
Error submitting comment. Please try again momentarily.